Homemade Choco Tacos
Remember those irresistible Choco Tacos from your childhood summers? I’ve always been a fan, but nothing beats sinking your teeth into Homemade Choco Tacos that you make yourself—crispy waffle shells filled with creamy ice cream, dipped in rich chocolate, and sprinkled with nuts for that perfect crunch. In my experience, recreating this treat at home brings back all the nostalgia while letting you customize every bite to your taste. It’s easier than you think, and trust me, the first time you shape those warm shells and watch them cool, you’ll feel like a pro baker.
Here’s the thing: store-bought versions are convenient, but they can’t compare to the fresh, homemade magic. What I love most about these Homemade Choco Tacos is how they combine the fun of DIY with gourmet results—no fancy equipment needed, just a waffle iron and some patience. If you’re craving a dessert that’s both playful and indulgent, this is it. Let’s dive into the recipe so you can whip up your own batch and impress everyone around you.
Key Takeaways:
- Homemade Choco Tacos offer a customizable twist on a classic frozen treat, perfect for summer gatherings.
- Prep time is just 30 minutes active, with chilling time making it an easy make-ahead option.
- The combination of creamy ice cream and crunchy chocolate coating delivers an unbeatable flavor explosion.
- Use a waffle iron for the crispiest shells—don’t skip the shaping step for that authentic taco form.
- Store extras in the freezer for up to a week; they’re a grab-and-go delight any time.
Why You’ll Adore This Homemade Choco Tacos
Ultimate Nostalgia Hit: There’s something magical about Homemade Choco Tacos that transports you back to simpler times, like childhood ice cream trucks on hot days. The crispy shell gives way to smooth, melty ice cream, creating that perfect balance we all crave. In my kitchen trials, this treat always sparks smiles and stories around the table.
Grab This Chef Knife Now - Almost Gone!

- Stays Razor-Sharp: Ice-hardened blade keeps its edge longer than ordinary knives
- Superior Grip Control: Unique finger hole design gives you perfect balance and safety
- Built to Last a Lifetime: Premium stainless steel blade with elegant beech wood handle
- ✓ Finally, a knife that stays sharp and feels comfortable in my hand
- ✓ Professional quality without the premium price tag
- ✓ Makes meal prep faster and more enjoyable
⏰ Only a few items left in stock - order soon
Surprisingly Simple to Create: You might think Homemade Choco Tacos require pro skills, but honestly, it’s all about basic ingredients and a little creativity with your waffle iron. I’ve made them countless times, and each batch gets easier, turning even beginner bakers into confident creators. The joy of seeing them come together is half the fun!
Endless Flavor Customization: What sets these Homemade Choco Tacos apart is how you can swap in your favorite ice cream flavors or add-ins, like caramel swirls or fruit chunks. They’re not just a dessert; they’re a canvas for your sweet tooth adventures. Trust me, once you start experimenting, you won’t go back to plain old tacos.
Family-Friendly Fun: Getting the kids involved in assembling Homemade Choco Tacos turns cooking into a bonding activity that’s as delicious as the result. The hands-on shaping and dipping keep everyone engaged, and the payoff is a treat that’s fresher and healthier than store-bought. It’s the kind of recipe that creates lasting memories with every crunchy bite.
Essential Ingredients for Homemade Choco Tacos
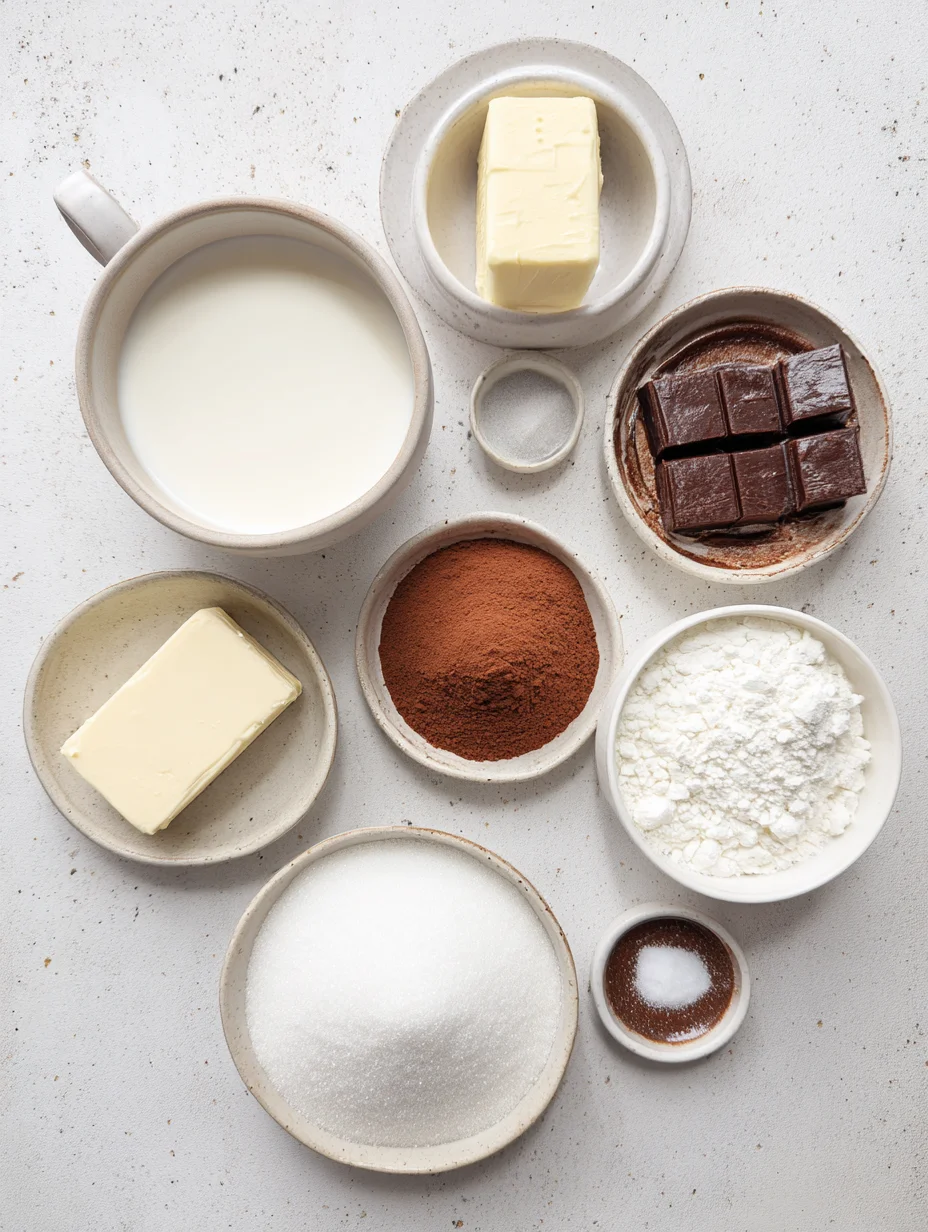
Waffle Batter Mix: The base of your Homemade Choco Tacos starts with a simple waffle batter made from flour, eggs, milk, sugar, and a touch of vanilla. This creates the crispy, golden shell that holds everything together without sogginess. In my experience, using room-temperature ingredients ensures even cooking and that signature foldable shape. It’s the foundation that makes these tacos so structurally sound and flavorful.
Grab This Kitchen Scale Now — Best Precision Pick!

- Razor-Accurate Every Time: Dual-increment precision down to 0.1g — perfect for baking, meal prep, and portion control with g, oz, ml, and fl'oz modes.
- Smart Removable Bowl Design: Detachable bowl doubles as a protective case for compact storage. Tare function lets you weigh ingredients in any container with zero fuss.
- Built for Everyday Convenience: Auto-zero, tare function, low battery alert, overload indicator, and 2-minute auto-off to extend battery life — all in a sleek stainless steel build.
- ✓ "Perfect for baking — precise, lightweight, and stores easily without wasting counter space"
- ✓ "A game changer! Weighing ingredients is now way more accurate than measuring cups"
- ✓ "Love the 0.1g precision and backlight — best food scale I've owned. Highly recommend!"
⏰ Only a few items left in stock - order soon
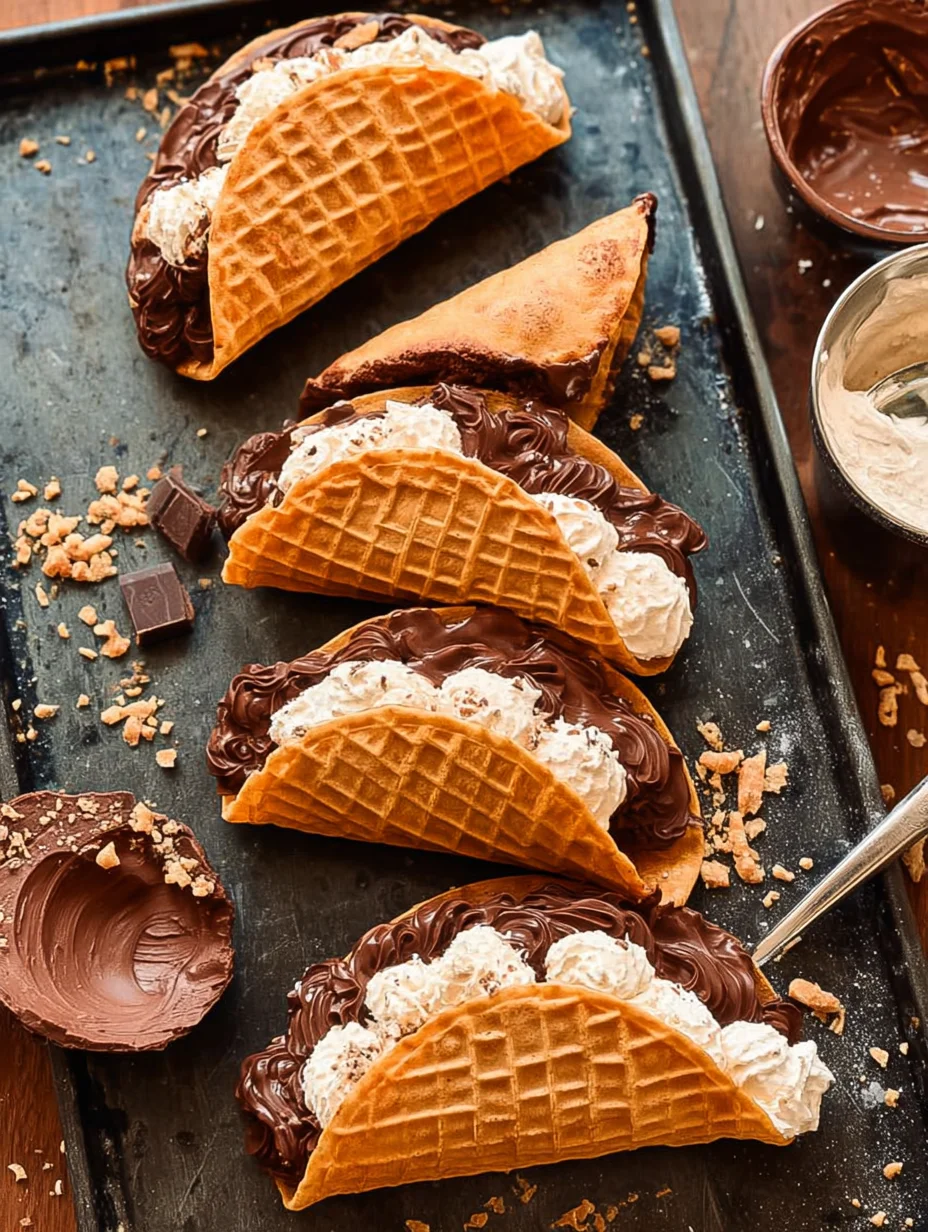
Vanilla Ice Cream: Creamy vanilla ice cream serves as the cool, smooth filling in Homemade Choco Tacos, balancing the warmth of the shell with its rich, velvety texture. I recommend a high-quality brand or homemade for the best melt-in-your-mouth experience—softened just enough to scoop easily. This ingredient ties the chocolate and nuts together, elevating the whole treat to dessert heaven. Without it, you’d miss that classic contrast that’s so addictive.
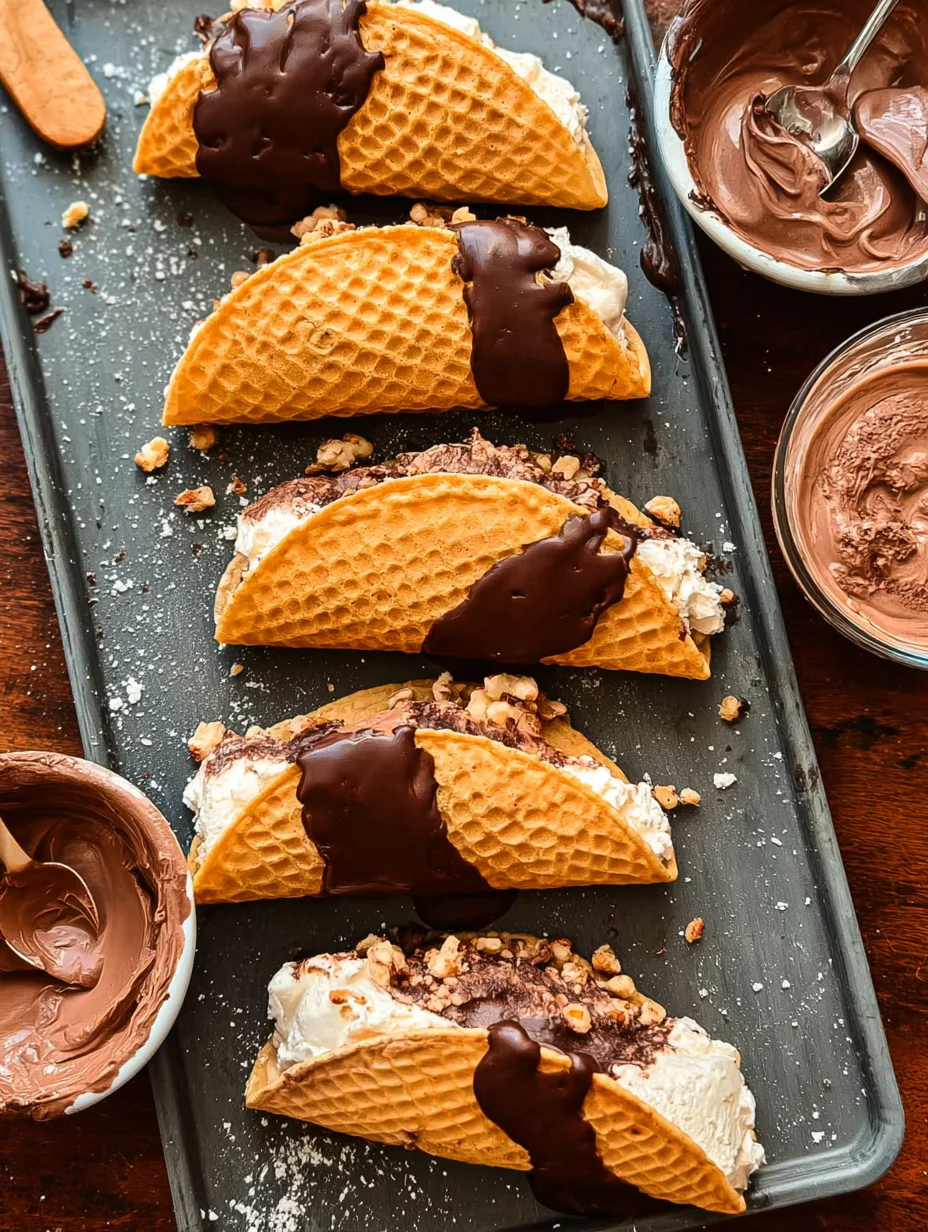
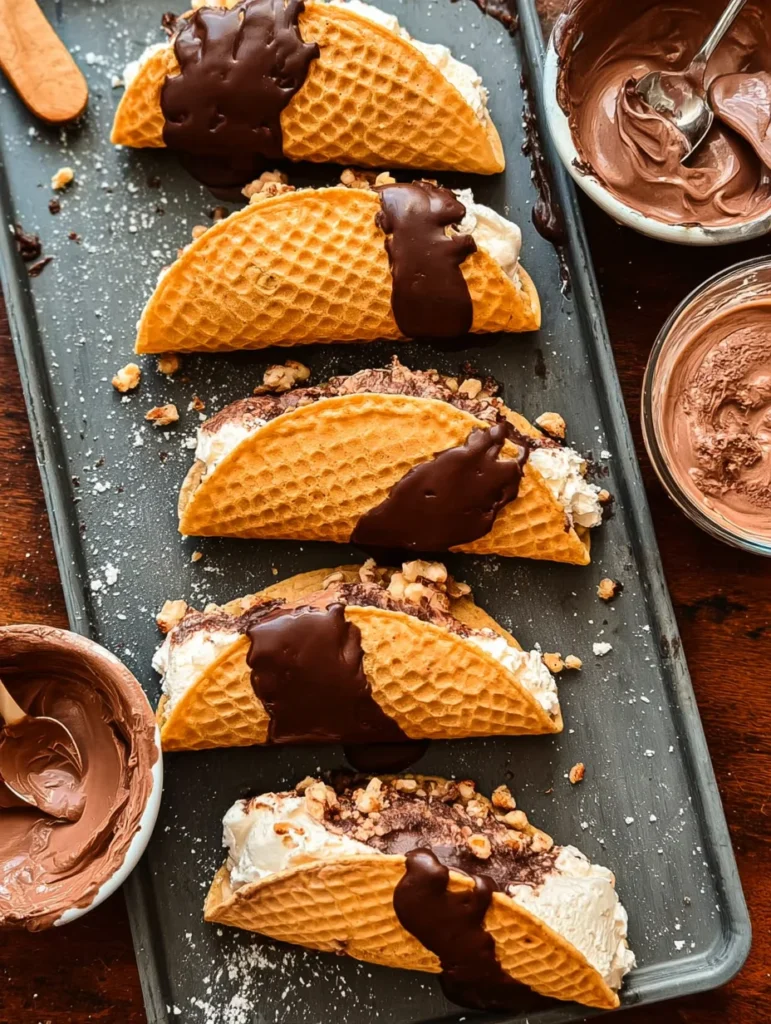
Chocolate Ganache and Chopped Nuts: Dark chocolate melted into a glossy ganache coats the filled Homemade Choco Tacos, adding a bittersweet depth that pairs perfectly with the sweetness inside. Chopped peanuts or pecans provide the crunch, mimicking the original while allowing for nut-free swaps if needed. These elements not only seal in the ice cream but also amp up the texture and taste in every satisfying bite. They’re what make your Homemade Choco Tacos feel indulgent yet homemade.
How to Make Homemade Choco Tacos
Prepare the Waffle Batter
Start by whisking together the flour, sugar, eggs, milk, and vanilla in a bowl until smooth—this is the heart of your Homemade Choco Tacos shells. Heat your waffle iron and lightly grease it, then pour in a small ladle of batter to form thin, even circles. Cook for about 1-2 minutes until golden and crisp, working in batches to avoid overcrowding. The aroma alone will have you excited; just be gentle when removing them to preserve that flexibility for shaping.
Shape and Fill the Shells
While the waffles are still warm, drape them over the edge of a rolling pin or a makeshift taco mold to form the classic shell shape— this step is crucial for authentic Homemade Choco Tacos. Let them cool for a few minutes until they hold their form, then gently fill each with a generous scoop of softened vanilla ice cream, pressing it in for even distribution. The creaminess against the fresh waffle is pure bliss; I always add a little extra because, why not? Freeze the filled shells on a baking sheet for at least 30 minutes to firm up before the next step.
Dip and Coat for the Finish
Melt your chocolate with a bit of coconut oil for a smooth ganache, then dip the frozen ends of your Homemade Choco Tacos into it, letting the excess drip off. Immediately roll the chocolate-dipped edges in chopped nuts for that irresistible crunch. Place them back on the sheet and freeze until set, about 15 minutes—the transformation from simple shells to decadent treats is magical. In my experience, this final touch seals in all the flavors, making each Homemade Choco Tacos a textural delight that’s hard to resist.
Ingredients
- 1 cup all-purpose flour
- 2 tablespoons granulated sugar
- 1 large egg
- 1 cup milk
- 1 teaspoon vanilla extract
- 2 cups vanilla ice cream, softened
- 8 oz dark chocolate, chopped
- 1 tablespoon coconut oil
- 1/2 cup chopped peanuts or pecans
- Pinch of salt
Homemade Choco Tacos Instructions
- Whisk flour, sugar, egg, milk, vanilla, and salt into a smooth batter. Preheat waffle iron.
- Pour batter to form 5-inch circles; cook 1-2 minutes until crisp. Drape over rolling pin to shape into taco shells; cool.
- Scoop ice cream into shells; freeze 30 minutes.
- Melt chocolate and oil; dip shell ends, then roll in nuts. Freeze 15 minutes until set. Serve immediately.
Pro Tips for the Best Homemade Choco Tacos
Perfect Shell Shaping: Work quickly with warm waffles to mold them—use foil-wrapped clothespins for a tighter taco form if needed.
Ice Cream Scooping: Let ice cream soften at room temp for 10 minutes; use an ice cream scoop for uniform fills that won’t overflow.
Chocolate Melting: Use a double boiler to prevent scorching—stir until silky for that pro-level coating on your Homemade Choco Tacos.
You Must Know
- These Homemade Choco Tacos are best eaten fresh to maintain crispiness— the shell softens over time due to moisture.
- Allergen alert: Nuts and dairy are key; always check for cross-contamination in your kitchen.
- Scale up the recipe easily for parties; just double ingredients for 12-16 tacos.
- The chocolate ganache sets faster in the freezer, but don’t rush—patience yields the smoothest finish.
How to Store Homemade Choco Tacos
To keep your Homemade Choco Tacos tasting fresh, wrap each one individually in plastic wrap and store in an airtight container in the freezer for up to one week. Avoid stacking them directly to prevent sticking or crushing the shells. When ready to enjoy, let them sit at room temperature for 2-3 minutes for easier biting—no reheating needed, as they’re best straight from the freezer. This method preserves the crunch and creaminess that make them so special.
Customizing Your Homemade Choco Tacos
Feel free to swap vanilla ice cream for chocolate or strawberry in your Homemade Choco Tacos to match seasonal fruits—try adding raspberry puree for a fruity twist. If nuts aren’t your thing, roll in crushed pretzels or sprinkles for variety without losing that crunch. For a gluten-free version, use a dedicated waffle iron and gluten-free flour blend. Experimenting like this keeps things exciting; check out our strawberry chocolate cake recipe for more berry inspiration.
What to Serve with Homemade Choco Tacos
Pair your Homemade Choco Tacos with a refreshing berry salad for a light contrast to their richness, or alongside fresh whipped cream for extra indulgence. A scoop of sorbet on the side adds a palate-cleansing tang, especially on hot days. Don’t forget beverages—iced coffee or a fruity sangria complements the chocolate notes beautifully. These simple additions turn a solo treat into a full dessert spread that’s sure to wow.
Homemade Choco Tacos
These homemade Choco Tacos are a fun, nostalgic treat that's perfect for summer! No churn fudge-swirled vanilla ice cream is stuffed inside a sweet and crispy waffle cone, then the whole thing is dipped in a chocolate and chopped peanut mixture.
Timing
Recipe Details
Ingredients
- 01 2 cups heavy cream (cold)
- 02 1 14oz can sweetened condensed milk
- 03 1 tbsp vanilla bean paste (or 2 tsp vanilla extract)
- 04 salt (pinch)
- 05 2 tablespoons cocoa powder
- 06 2 tablespoons granulated sugar
- 07 2 tablespoons heavy cream
- 08 1 tablespoon unsalted butter
- 09 1/2 teaspoon vanilla extract
- 10 salt (pinch)
- 11 2 egg whites
- 12 3 1/2 tablespoons granulated sugar
- 13 3 1/2 tablespoons brown sugar
- 14 3/4 teaspoon vanilla extract
- 15 1/8 teaspoon salt
- 16 2/3 cup flour
- 17 2 tbsp melted butter
- 18 1 1/2 cups chocolate chips
- 19 1 1/2 tablespoon coconut oil
- 20 3/4 cup finely chopped peanuts
Instructions
Make the fudge sauce for the ice cream ripple. In a small saucepan, whisk together the cocoa powder, sugar and heavy cream over medium-low heat. Once it starts to heat up, add in the butter and whisk until the butter is melted and the mixture is smooth and shiny. Remove from heat and whisk in the vanilla and salt. Set aside to cool.
Prepare the ice cream base. Add heavy cream to a stand mixer (or a bowl with a hand mixer) and beat until stiff peaks form (a few minutes). In a large bowl, mix together condensed milk, vanilla bean paste and salt. Add about 1 cup of the whipped cream in and gently fold it in, then add in the remaining whipped cream and fold until no lumps remain.
Layer the ice cream. Pour 1/4 of the ice cream base into a loaf pan, then drizzle on 1/3 of the fudge sauce. Repeat 3 more times, finishing with a layer of ice cream. Freeze until set – about 3 hours.
Make the waffle cones. Add egg whites, both sugars and vanilla extract to a bowl and beat with a hand mixer until well combined. Add in salt and half of the flour and continue mixing until smooth. Add in remaining flour and melted butter and mix until a smooth batter forms. The batter should be thick. Preheat waffle cone maker to just above medium heat. Place one heaping tablespoon of batter in the center of the waffle cone maker, then close it. Every waffle cone maker will cook differently, but ours took about 3 minutes to get golden brown. Remove with tongs, let cool for a few seconds, then (carefully) shape into a taco shape with your hands and hold in place for 15 seconds. They will harden in less than a minute.
Scoop ice cream into shells and freeze briefly. Scoop slightly softened ice cream into each of the “taco” cones, using a small spatula or the back of a spoon to smooth out the ice cream. Place in freezer for 10-15 minutes.
Prepare peanut-chocolate topping and assemble. Add chocolate chips and coconut oil to a microwave safe bowl. Microwave in 30 second intervals, stirring well between each interval, until fully melted. Stir in chopped peanuts. Dip the top of ice cream taco in the chocolate peanut mixture. Return to freezer for 5-10 minutes, or until hardened. Keep stored in freezer.
FILED UNDER:
NUTRITION FACTS (PER SERVING)
Nutrition information is calculated using an ingredient database and should be considered an estimate. In cases where multiple ingredient alternatives are given, the first listed is calculated for nutrition. Garnishes and optional ingredients are not included.
Frequently Asked Questions About Homemade Choco Tacos
Can I make Homemade Choco Tacos ahead of time?
Absolutely, you can prepare the shells and fillings a day in advance, then assemble and freeze until ready. This make-ahead approach saves time for parties without sacrificing quality. Just ensure they’re well-wrapped to avoid freezer burn.
How long does Homemade Choco Tacos last in the fridge?
While they’re primarily a frozen treat, if you must refrigerate, they last 2-3 days but may soften quickly. For best results, stick to the freezer where they maintain texture up to a week. Thaw slightly before serving for optimal enjoyment.
Are Homemade Choco Tacos gluten-free?
By default, no, due to the flour in the waffle batter, but you can easily adapt with a 1:1 gluten-free flour substitute. I’ve tried it and the shells hold up just as well. Always verify your ingredients for full gluten-free assurance.
Can kids help make Homemade Choco Tacos?
Yes, this recipe is perfect for little hands—let them scoop ice cream and roll in nuts for fun involvement in your Homemade Choco Tacos. Supervise the hot waffle iron, of course. It’s a great way to teach basic kitchen skills through play.
What’s the best chocolate for Homemade Choco Tacos?
Dark chocolate with at least 60% cocoa gives the richest flavor without overpowering the ice cream. Milk chocolate works for a sweeter profile if preferred.
How do I prevent the shells from breaking when filling Homemade Choco Tacos?
Fill only after the shells are fully cooled and slightly flexible—overfilling leads to cracks. Use a piping bag for precise ice cream insertion in your Homemade Choco Tacos. If one breaks, no worries; patch it with extra chocolate.
Can I use a different filling besides ice cream for Homemade Choco Tacos?
Sure, try frozen yogurt for a lighter option or even sorbet for dairy-free vibes. The shell’s versatility makes experimentation easy.
Where can I find more frozen dessert ideas like Homemade Choco Tacos?
Explore other cool treats on our site; for instance, our lemon mousse recipe offers a refreshing alternative, or try the copycat Magnolia Bakery cupcakes for baked fun. These pair well with your taco adventures.
Final Thoughts
There’s truly nothing quite like the satisfaction of crafting your own Homemade Choco Tacos—from the first waffle crisp to the final chocolate dip, it’s a process that rewards every step with delicious results. I hope this recipe inspires you to gather your loved ones and create some sweet memories in the kitchen. Give it a try this weekend; you won’t regret it, and who knows, it might just become your new go-to treat. Share your twists in the comments—I’d love to hear how your Homemade Choco Tacos turned out!