Garlic Bread
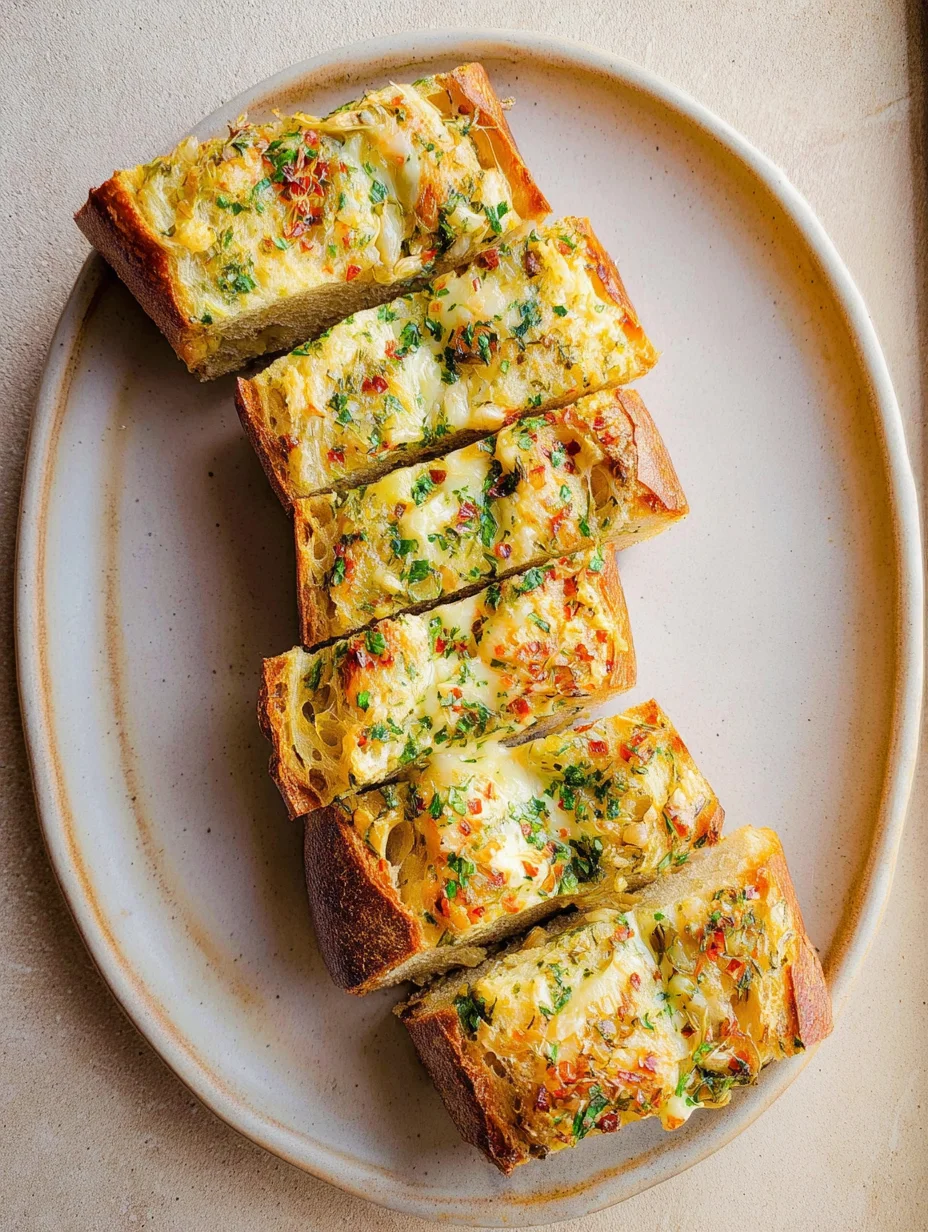
There’s something undeniably magical about the aroma of fresh Garlic Bread wafting through the kitchen—it’s like an instant invitation to gather around the table. I remember the first time I made homemade Garlic Bread for a family dinner; the golden, crusty edges and that buttery, garlicky goodness had everyone reaching for seconds before the main course even hit the plates. If you’re craving that perfect side dish to elevate your meals, this Garlic Bread recipe is your new best friend.
In my experience, nothing beats the simplicity of whipping up Garlic Bread from scratch—it’s quick, forgiving for beginners, and endlessly customizable. Whether you’re pairing it with pasta or enjoying it solo as a snack, this Garlic Bread delivers on flavor every single time. Let’s dive into how you can create this crowd-pleaser in your own home; I promise it’ll become a staple in your recipe rotation.
Key Takeaways:
- Garlic Bread is a versatile side that pairs perfectly with Italian dishes and beyond.
- Prep and bake in under 30 minutes for effortless weeknight wins.
- Buttery, garlicky flavors with a crispy exterior make every bite irresistible.
- Use fresh garlic for maximum punch—dried just doesn’t compare.
- Store leftovers in the fridge for up to 3 days and reheat for fresh-baked taste.
Why You’ll Adore This Garlic Bread
Irresistible Aroma and Flavor: The moment you spread that garlic butter on the bread, your kitchen transforms into an Italian bistro. This Garlic Bread’s bold, savory notes from fresh garlic and herbs will have your taste buds dancing—it’s pure comfort in every slice. I’ve lost count of how many times it’s stolen the show at potlucks.
Grab This Chef Knife Now - Almost Gone!

- Stays Razor-Sharp: Ice-hardened blade keeps its edge longer than ordinary knives
- Superior Grip Control: Unique finger hole design gives you perfect balance and safety
- Built to Last a Lifetime: Premium stainless steel blade with elegant beech wood handle
- ✓ Finally, a knife that stays sharp and feels comfortable in my hand
- ✓ Professional quality without the premium price tag
- ✓ Makes meal prep faster and more enjoyable
⏰ Only a few items left in stock - order soon
Quick and Easy Preparation: You won’t believe how fast this comes together; no fancy equipment needed, just a oven or even a grill in a pinch. It’s beginner-friendly, letting you focus on enjoying the meal rather than stressing over the side. Here’s the thing: even on busy nights, you can have warm Garlic Bread ready without breaking a sweat.
Customizable for Any Occasion: Dress it up with cheese for a cheesy Garlic Bread twist or keep it classic— the choice is yours. This flexibility makes it ideal for everything from casual dinners to holiday spreads. What I find interesting is how it adapts so seamlessly to different cuisines.
Budget-Friendly Wow Factor: Made with pantry staples, this Garlic Bread punches way above its weight in impressiveness. You’ll love how it turns simple ingredients into something gourmet-worthy. Let’s be honest, who doesn’t want that kind of magic on a dime?
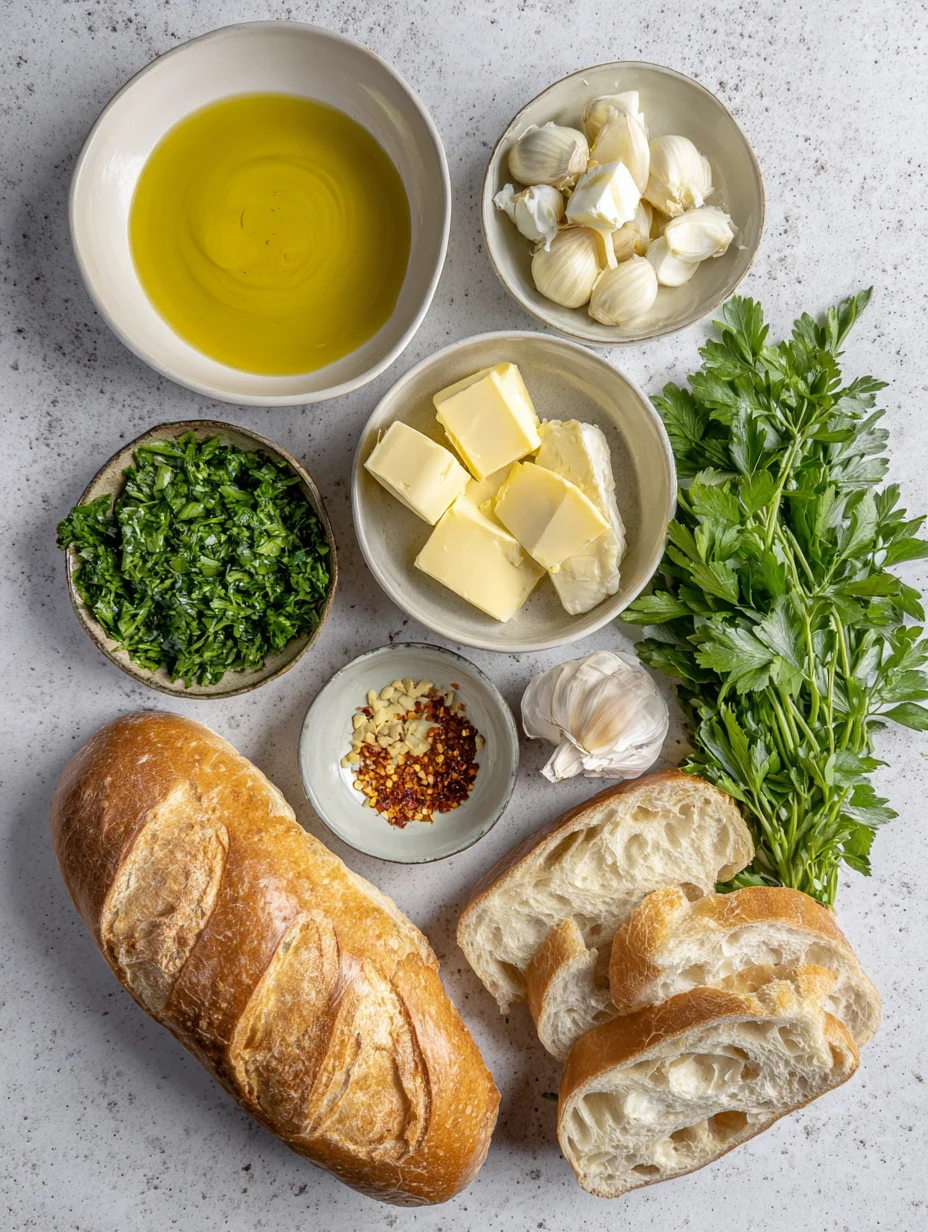
Essential Ingredients for Garlic Bread
French Baguette: The foundation of any great Garlic Bread, this crusty bread provides the perfect chewy interior and crisp exterior when baked. I always opt for a fresh, day-old baguette to avoid sogginess— it soaks up the butter just right without falling apart. In my experience, slicing it lengthwise ensures even toasting for that signature texture everyone craves.
Grab This Kitchen Scale Now — Best Precision Pick!

- Razor-Accurate Every Time: Dual-increment precision down to 0.1g — perfect for baking, meal prep, and portion control with g, oz, ml, and fl'oz modes.
- Smart Removable Bowl Design: Detachable bowl doubles as a protective case for compact storage. Tare function lets you weigh ingredients in any container with zero fuss.
- Built for Everyday Convenience: Auto-zero, tare function, low battery alert, overload indicator, and 2-minute auto-off to extend battery life — all in a sleek stainless steel build.
- ✓ "Perfect for baking — precise, lightweight, and stores easily without wasting counter space"
- ✓ "A game changer! Weighing ingredients is now way more accurate than measuring cups"
- ✓ "Love the 0.1g precision and backlight — best food scale I've owned. Highly recommend!"
⏰ Only a few items left in stock - order soon
Unsalted Butter: Softened butter is the creamy vehicle for all those garlicky flavors, melting into the bread for ultimate richness. It helps create that golden crust while keeping the inside tender and moist. Don’t skimp here; using salted butter can make the Garlic Bread overly salty, throwing off the balance.
Fresh Garlic Cloves: Minced fresh garlic is non-negotiable for the punchy, aromatic essence that defines delicious Garlic Bread. It releases its oils during mixing and baking, infusing every bite with bold flavor. I’ve tried jarred versions, but nothing beats the vibrancy of crushing your own cloves right before use.
How to Make Garlic Bread
Prepare the Garlic Butter Mixture
Start by softening your butter at room temperature— this makes it easy to blend with minced garlic, chopped parsley, and a pinch of salt. In a bowl, mash everything together until it’s smooth and fragrant; the garlic’s sharpness will mellow beautifully as it bakes. This step is crucial for infusing your Garlic Bread with that authentic, buttery essence I love so much. Take your time here to ensure even distribution—no one wants uneven garlic bites.
Assemble and Bake the Bread
Slice your baguette lengthwise, then generously spread the garlic butter on both halves—don’t hold back, as this is what makes the Garlic Bread shine. Place it cut-side up on a baking sheet and pop it into a preheated 400°F oven for about 10-12 minutes, watching for that perfect golden edge. The kitchen will fill with an intoxicating aroma, signaling it’s almost time to dig in. If you like it extra crispy, broil for the last minute, but keep an eye out to avoid burning.
Serve Your Fresh Garlic Bread
Once out of the oven, let the Garlic Bread cool for a couple minutes before slicing into pieces— this helps the butter set just right. Sprinkle with a bit more parsley for color and freshness if desired. Serving it warm alongside your favorite pasta, like our spaghetti recipe, turns any meal into a feast. In my experience, it’s best enjoyed straight away to capture that steamy, garlicky perfection.
Ingredients
- 1 French baguette (about 12-14 inches long)
- 1/2 cup unsalted butter, softened
- 4-5 garlic cloves, minced
- 2 tablespoons fresh parsley, chopped
- 1/4 teaspoon salt
- Optional: 1/2 cup shredded mozzarella for cheesy Garlic Bread
Garlic Bread Instructions
- Preheat your oven to 400°F (200°C) and line a baking sheet with parchment paper for easy cleanup.
- In a medium bowl, combine softened butter, minced garlic, chopped parsley, and salt; mix until well incorporated and spreadable.
- Slice the baguette lengthwise without cutting all the way through, then generously spread the garlic butter mixture over the cut sides.
- Place the bread cut-side up on the prepared baking sheet and bake for 10-12 minutes, or until the edges are golden and crispy.
- For extra cheese, sprinkle mozzarella on top during the last 2 minutes of baking. Let cool slightly before serving.
- Slice into portions and enjoy your homemade Garlic Bread warm!

Pro Tips for the Best Garlic Bread
Fresh Garlic Only: Always use fresh minced garlic—it provides a brighter, more potent flavor than pre-minced varieties, elevating your Garlic Bread immensely.
Room Temperature Butter: Ensure your butter is fully softened for easy spreading; this prevents tearing the bread and ensures even coverage.
Don’t Overbake: Check at 10 minutes to avoid dryness—perfect Garlic Bread should be crispy outside but soft within.
You Must Know
- Garlic Bread originated as a simple peasant food in Italy, using leftover bread and abundant garlic.
- Fresh herbs like parsley not only add color but also balance the richness of the butter.
- Baking at high heat creates steam inside the bread for that desirable chewy texture.
- This recipe scales easily—double it for larger gatherings without extra effort.
How to Store Garlic Bread
To keep your Garlic Bread fresh, wrap leftovers tightly in foil or store in an airtight container at room temperature for up to one day. For longer storage, refrigerate it for 2-3 days, where it maintains its flavor best. Reheat in a 350°F oven for 5-7 minutes to revive the crispiness—avoid the microwave to prevent sogginess. I’ve found this method keeps the Garlic Bread tasting almost as good as day one.
Customizing Your Garlic Bread
If you’re looking to switch things up, try adding grated Parmesan or mozzarella for a cheesy Garlic Bread variation that’s hard to resist. For a vegan twist, swap butter for olive oil and use plant-based cheese— it still delivers that classic crunch. You can even incorporate roasted garlic for a milder, sweeter profile. Check out our cheesy Garlic Bread recipe for more inspiration on melty upgrades. This Garlic Bread adapts beautifully to your dietary needs without losing its charm.
What to Serve with Garlic Bread
Garlic Bread shines brightest alongside hearty pasta dishes like marinara or alfredo, where it soaks up sauces perfectly. Pair it with a fresh Caesar salad for balance, adding crunch and lightness to the meal. For a fun twist, serve with soups such as minestrone or even grilled meats for dipping. Don’t forget a glass of red wine— it complements the garlicky notes beautifully. In my experience, these combos make for unforgettable dinners.

Garlic Bread
Vampires, beware! This is the most garlicky garlic bread you’ll ever have.
Timing
Recipe Details
Ingredients
- 01 250 g salted butter
- 02 24-30 garlic confit cloves
- 03 1 tbsp garlic confit olive oil
- 04 1 large handful parsley ((plus extra to serve))
- 05 1 cup pecorino romano ((plus extra to serve))
- 06 50 g mozzarella
- 07 1 ciabatta loaf ((cut in half lengthways))
- 08 1 tbsp honey
- 09 1 tsp chilli flakes
Instructions
Place the garlic confit cloves, salted butter, parsley and pecorino romano into a food processor and blend until well combined. Place the butter into the fridge for 20 minutes to slightly harden.
Spread roughly 4 tbsp of butter onto each slice of ciabatta and sprinkle with some extra pecorino romano and the mozzarella.
Place under the grill for 5 – 10 minutes or until the cheese is golden and bubbling.
Take out of the grill and sprinkle with finely chopped parsley, chili flakes and a drizzle of honey. Slice and serve immediately.
Reserve the leftover butter by rolling it into a log in parchment paper and storing in the fridge. It can be used to spread onto toast, roast chicken or vegetables, fry eggs or make more garlic bread! Store for up to 3 weeks.
FILED UNDER:
NUTRITION FACTS (PER SERVING)
Nutrition information is calculated using an ingredient database and should be considered an estimate. In cases where multiple ingredient alternatives are given, the first listed is calculated for nutrition. Garnishes and optional ingredients are not included.
Must-Know Tips
Professional Secrets
Frequently Asked Questions About Garlic Bread
Can I make Garlic Bread ahead of time?
Yes, you can prepare the garlic butter and slice the bread up to a day in advance, then assemble and bake just before serving for the freshest taste. This method saves time during busy evenings. However, avoid baking it too early, as it can become chewy if reheated multiple times.
How long does Garlic Bread last in the fridge?
Properly stored Garlic Bread will stay good in the fridge for up to 3 days, wrapped tightly to prevent drying out. Beyond that, the texture might soften. For best results, freeze slices for up to a month if you make a big batch.
Is Garlic Bread gluten-free?
Traditional Garlic Bread isn’t gluten-free due to the wheat-based baguette, but you can easily swap it for a gluten-free bread alternative. The garlic butter topping works just as well on these options. Just ensure your bread holds up during baking for that classic crisp.
Can I use a different bread for Garlic Bread?
Absolutely, while French baguette is ideal, sourdough or ciabatta makes excellent Garlic Bread with their airy textures. Experiment to find your favorite—I’ve had great success with whole grain varieties for added nutrition. This flexibility keeps the recipe exciting.
How do I make vegan Garlic Bread?
For vegan Garlic Bread, replace butter with a plant-based spread or olive oil, and skip any cheese toppings. Fresh garlic and herbs remain the stars, ensuring robust flavor. It’s a simple swap that doesn’t compromise on taste at all.
What’s the best way to reheat Garlic Bread?
The oven is your best bet for reheating Garlic Bread—wrap in foil and heat at 350°F for 5-10 minutes to restore crispiness. This method revives the buttery goodness without making it tough. Microwaving is a last resort, as it often results in sogginess.
Why is my Garlic Bread soggy?
Sogginess usually comes from too much butter or underbaking—use just enough spread and ensure full golden edges. Also, let it cool on a wire rack post-bake. With these tweaks, your Garlic Bread will always come out perfectly textured.
Can I grill Garlic Bread instead of baking?
Yes, grilling adds a smoky char that’s divine on Garlic Bread—brush with the mixture and grill cut-side down for 2-3 minutes per side. It’s perfect for summer barbecues. Watch closely to prevent burning, and enjoy the outdoor twist.
Final Thoughts
From the first whiff of garlic to the last satisfying crunch, this Garlic Bread recipe has a way of bringing people together over simple, delicious food. I’ve shared it countless times, and it never fails to impress— whether for a cozy night in or a lively gathering. Give it a try this week; you won’t regret adding such an easy winner to your repertoire. What’s your favorite way to enjoy Garlic Bread? Drop a comment and let me know!