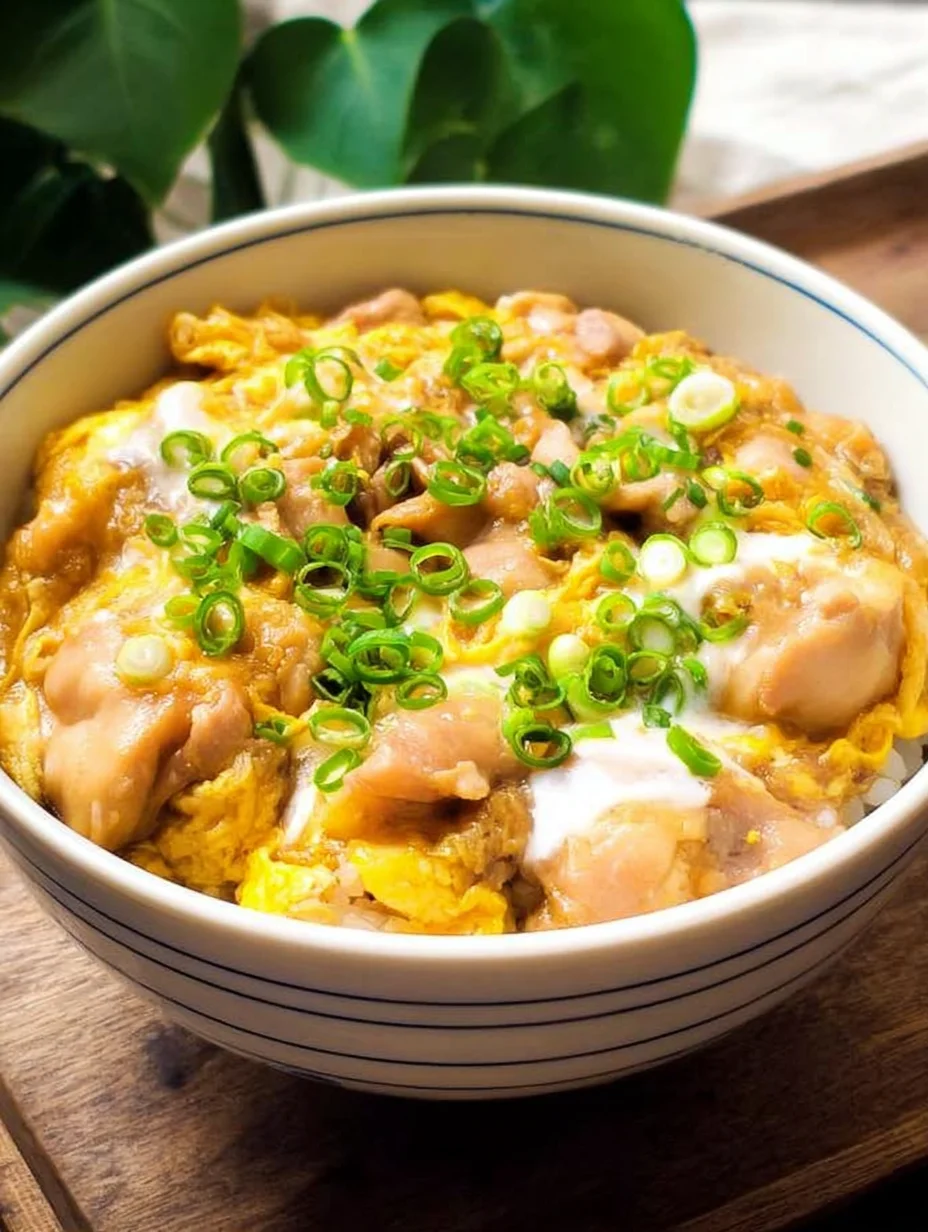
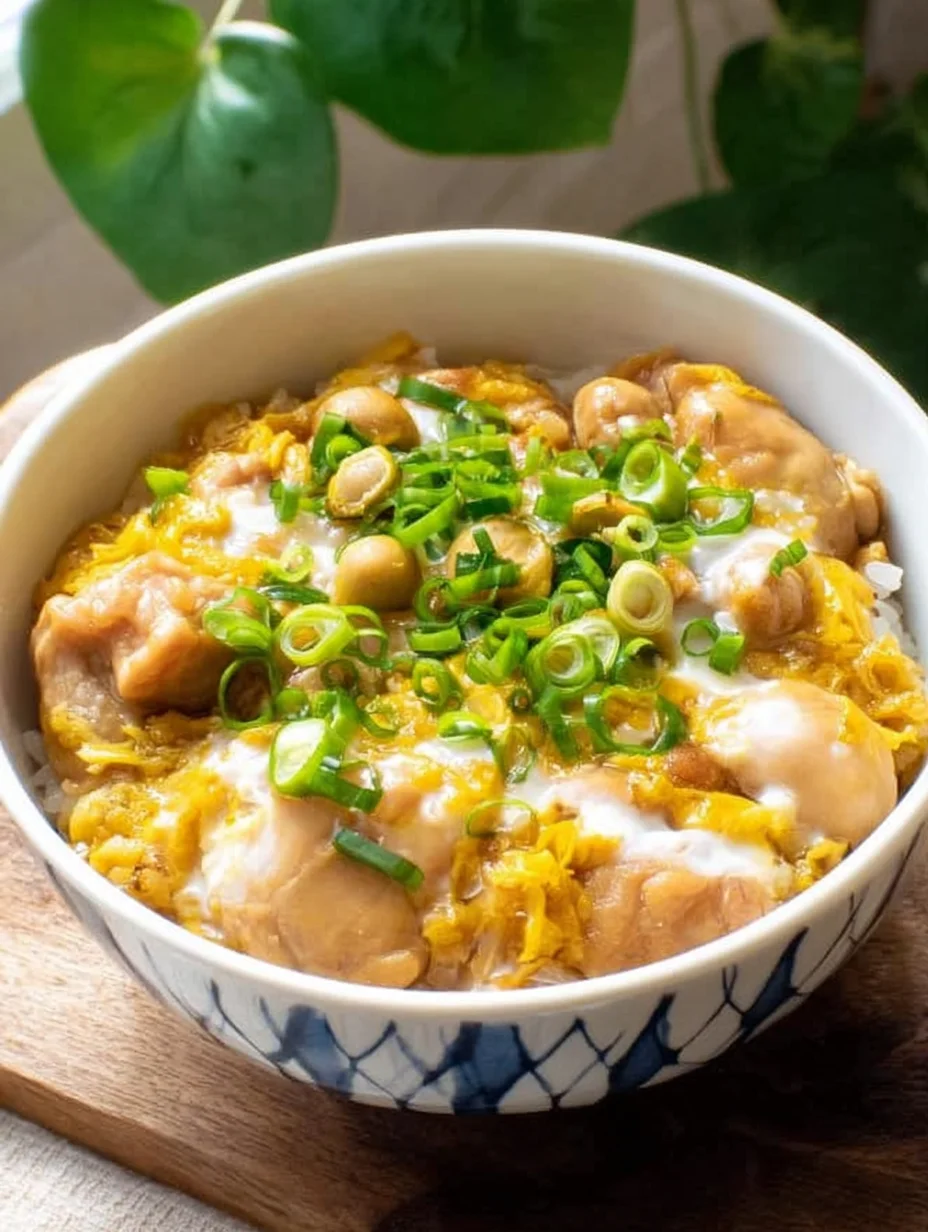
15-Minute Oyakodon (Japanese Chicken & Egg Rice Bowl)
There’s something incredibly comforting about a warm bowl of Oyakodon on a chilly evening, isn’t there? As someone who’s always on the hunt for quick, flavorful meals that feel like a hug from home, I first tried this Japanese classic during a trip to Tokyo, and it stole my heart instantly. The tender chicken, silky eggs, and sweet-savory onions all nestled over steaming rice—it’s the perfect balance of comfort and excitement. I’ve since recreated my own version of Oyakodon at home, tweaking it to make it even easier for busy weeknights, and now I’m thrilled to share this homemade Oyakodon recipe with you so you can experience that same joy.
In my experience, what makes Oyakodon stand out is how it comes together in under 30 minutes, yet tastes like you’ve spent hours in the kitchen. It’s a staple in Japanese cuisine that combines everyday ingredients into something truly special. Whether you’re new to cooking Asian-inspired dishes or a seasoned fan, this easy Oyakodon will become a go-to in your rotation. Let’s dive into how to make this delicious Oyakodon that my family can’t get enough of—trust me, one bite and you’ll be hooked.
Key Takeaways:
- Oyakodon is a quick Japanese comfort food featuring chicken and egg over rice, ready in about 25 minutes.
- It’s incredibly versatile for weeknight dinners, using simple pantry staples you likely already have.
- The savory-sweet flavor profile from the dashi broth makes every bite of this Oyakodon irresistible.
- For the best results, use fresh eggs and don’t overcook the chicken to keep your Oyakodon tender.
- Store leftovers in the fridge for up to two days; reheat gently to maintain the Oyakodon’s texture.
Why You’ll Adore This Oyakodon
Quick and Effortless Prep: I love how this Oyakodon comes together so fast—perfect for those hectic evenings when you need dinner on the table without fuss. In just a few steps, you’ll have a meal that’s both nourishing and delicious, saving you precious time after a long day. It’s the kind of recipe that makes home cooking feel achievable and fun.
Grab This Chef Knife Now - Almost Gone!

- Stays Razor-Sharp: Ice-hardened blade keeps its edge longer than ordinary knives
- Superior Grip Control: Unique finger hole design gives you perfect balance and safety
- Built to Last a Lifetime: Premium stainless steel blade with elegant beech wood handle
- ✓ Finally, a knife that stays sharp and feels comfortable in my hand
- ✓ Professional quality without the premium price tag
- ✓ Makes meal prep faster and more enjoyable
⏰ Only a few items left in stock - order soon
Rich, Umami-Packed Flavors: The combination of soy sauce, mirin, and dashi in this Oyakodon creates layers of savory depth that dance on your taste buds. What I find interesting is how such simple ingredients can yield such a bold, comforting taste—it’s like a flavor hug in bowl form. You’ll keep coming back for more, I promise.
Family-Friendly Comfort: This Oyakodon is a hit with kids and adults alike, offering that homey feel without being overly complicated. Here’s the thing: it’s customizable, so everyone can tweak it to their liking, making meal time stress-free and enjoyable.
Healthy Yet Indulgent: Packed with protein from chicken and eggs, this Oyakodon feels wholesome while still satisfying those comfort food cravings. Let’s be honest, who doesn’t love a dish that’s both good for you and tastes amazing? It’s my go-to when I want something nourishing without sacrificing flavor.
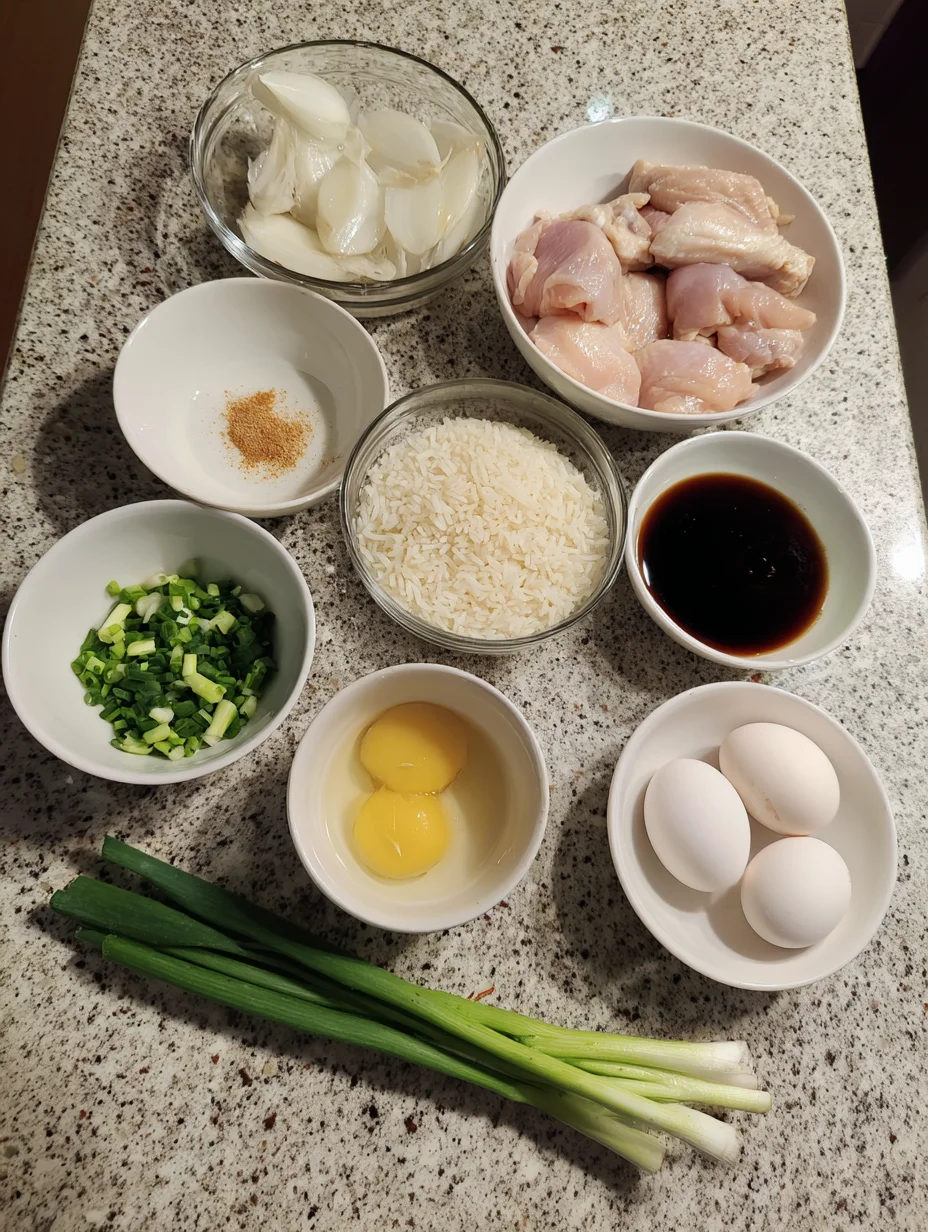
Essential Ingredients for Oyakodon
Chicken Thighs: Boneless, skinless chicken thighs are the star here, providing juicy, tender meat that soaks up all the savory broth beautifully. I always opt for thighs over breasts because they stay moist during cooking, which is crucial for that perfect Oyakodon texture. In my experience, slicing them thinly ensures even cooking and maximum flavor absorption from the seasonings. They’re affordable and versatile, making this dish accessible for any home cook.
Grab This Kitchen Scale Now — Best Precision Pick!

- Razor-Accurate Every Time: Dual-increment precision down to 0.1g — perfect for baking, meal prep, and portion control with g, oz, ml, and fl'oz modes.
- Smart Removable Bowl Design: Detachable bowl doubles as a protective case for compact storage. Tare function lets you weigh ingredients in any container with zero fuss.
- Built for Everyday Convenience: Auto-zero, tare function, low battery alert, overload indicator, and 2-minute auto-off to extend battery life — all in a sleek stainless steel build.
- ✓ "Perfect for baking — precise, lightweight, and stores easily without wasting counter space"
- ✓ "A game changer! Weighing ingredients is now way more accurate than measuring cups"
- ✓ "Love the 0.1g precision and backlight — best food scale I've owned. Highly recommend!"
⏰ Only a few items left in stock - order soon
Eggs: Fresh eggs are essential, beaten just enough to create those soft, custardy layers that gently coat the chicken and onions. The way they set in the hot broth adds a creamy richness that’s signature to Oyakodon without overpowering the other elements. I’ve found that using high-quality eggs elevates the whole dish, giving it that authentic Japanese silkiness. They’re also a great source of protein, keeping the meal balanced and satisfying.
Onions: Sweet onions, thinly sliced, provide a subtle crunch and natural sweetness that balances the saltiness in this Oyakodon. As they cook down in the broth, they release their juices, thickening the sauce naturally for a glossy finish. What I love is how onions tie everything together, adding depth without needing extra sugar. For the best results, choose firm onions to avoid mushiness in your final dish.
How to Make Oyakodon
Prepare the Broth and Chicken
Start by slicing your chicken thighs into bite-sized pieces and thinly slicing the onions— this sets the stage for even cooking in your Oyakodon. In a small bowl, whisk together dashi stock, soy sauce, mirin, and a touch of sugar to create the flavorful base that defines this dish. Heat a pan over medium heat, add a drizzle of oil, and sauté the onions until they’re translucent and fragrant, about 3-4 minutes. Then, add the chicken pieces, stirring occasionally until they start to brown slightly, which takes another 4-5 minutes. Pour in the broth mixture, bringing it to a gentle simmer, and let it cook for about 5 minutes to infuse all those savory notes. The aroma alone will have you excited for the Oyakodon ahead.
Add the Eggs and Cook Gently
Once the chicken is nearly cooked through, drizzle the beaten eggs over the simmering mixture in a circular motion—don’t stir right away to let them set into soft ribbons. Cover the pan partially and cook for 1-2 minutes, until the eggs are just set but still creamy, capturing that classic Oyakodon texture. The steam helps the eggs poach gently without breaking apart, and you’ll notice the broth thickening slightly from the onions. Keep an eye on the timing here; overcooking can make the eggs tough, so trust your instincts based on how they look. This step is where the magic happens, blending everything into a cohesive, comforting whole.
Serve Over Rice
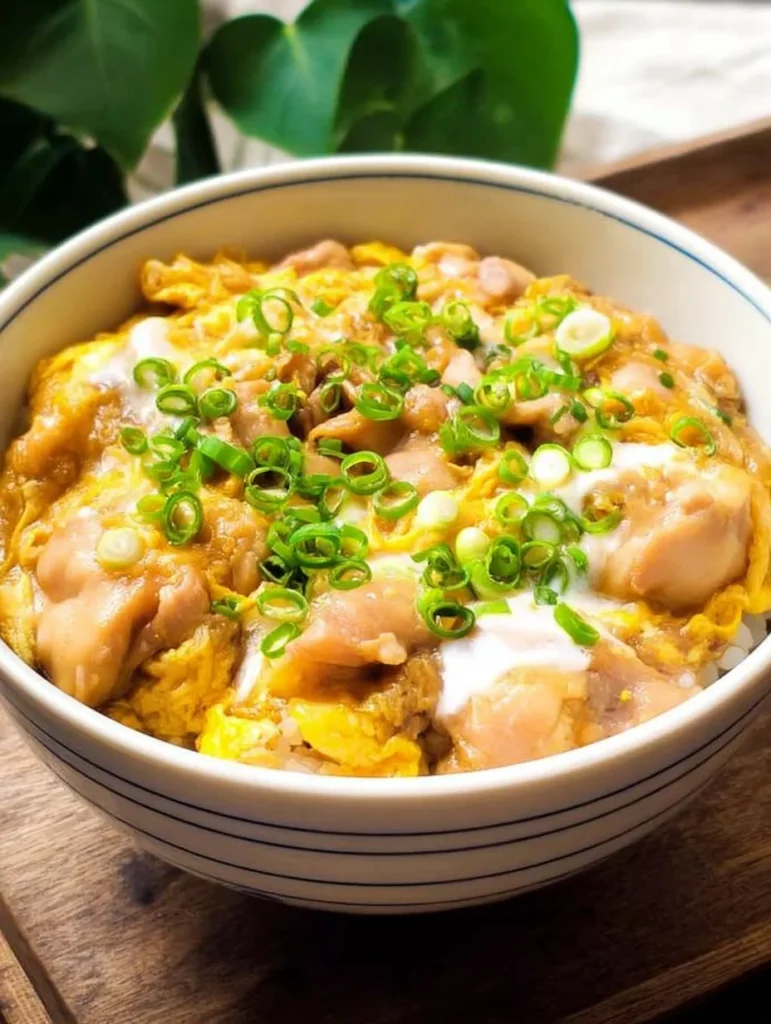
Scoop hot steamed rice into bowls, then ladle the chicken, egg, and onion mixture generously over the top for your finished Oyakodon. Garnish with chopped green onions or a sprinkle of shichimi togarashi for a pop of color and heat if you like. The contrast of the fluffy rice against the warm, saucy topping is pure bliss, and it all comes together in under 30 minutes. In my kitchen, I always make extra because seconds are inevitable with this delicious Oyakodon. Let it sit for a minute to soak up the juices before digging in—enjoy every comforting bite.
Ingredients
- 2 boneless, skinless chicken thighs, sliced into bite-sized pieces
- 1 large sweet onion, thinly sliced
- 3 large eggs, beaten
- 1 cup dashi stock
- 2 tablespoons soy sauce
- 2 tablespoons mirin
- 1 tablespoon sugar
- 2 cups cooked Japanese short-grain rice
- 2 green onions, chopped for garnish
- Vegetable oil for cooking
Oyakodon Instructions
- Slice chicken and onions as directed.
- Mix dashi, soy sauce, mirin, and sugar.
- Sauté onions in oiled pan until soft, add chicken, brown slightly.
- Pour in broth, simmer 5 minutes.
- Add beaten eggs, cover and cook 1-2 minutes until set.
- Serve over hot rice, garnish, and enjoy.
Pro Tips for the Best Oyakodon
Use Medium Heat: Keep the simmer gentle to prevent the eggs from turning rubbery in your Oyakodon—patience here pays off big time.
Fresh Dashi Matters: If you can, make dashi from scratch; it amps up the umami and makes the whole Oyakodon taste more authentic.
Slice Evenly: Uniform chicken and onion pieces ensure everything cooks at the same rate for a balanced, professional-looking dish.
You Must Know
- Oyakodon translates to “parent-child” referring to the chicken (parent) and egg (child) combo—it’s a fun cultural nod.
- This dish is best eaten fresh; the eggs lose their silkiness when reheated too much.
- Traditional Oyakodon uses a donburi bowl, but any deep bowl works great at home.
- Mirin adds sweetness and shine; don’t skip it for that glossy finish.
How to Store Oyakodon
To keep your Oyakodon fresh, let it cool slightly before transferring to an airtight container and refrigerating—it’ll last up to two days without losing too much appeal. For reheating, gently warm in a pan over low heat with a splash of dashi to revive the moisture, or microwave in short bursts, stirring midway. Freezing isn’t ideal as the eggs can become watery, but if needed, portion and freeze for up to a month, though texture may vary. Always check for freshness before eating to ensure your Oyakodon stays delicious.
Customizing Your Oyakodon
If you’re looking to switch things up, try substituting pork for chicken in your Oyakodon for a heartier twist, or add mushrooms for extra earthiness. For a vegetarian version, tofu works wonderfully in place of meat, keeping that tender bite intact. I’ve even experimented with adding spinach for a nutrient boost without altering the classic flavors. Check out this Korean ground beef bowl for more Asian-inspired ideas to riff on.
What to Serve with Oyakodon
Pair your Oyakodon with a simple miso soup for that authentic Japanese meal feel, or a fresh cucumber salad to cut through the richness. Steamed veggies like broccoli or a side of pickled radish add crunch and balance. For drinks, green tea complements the flavors perfectly, or opt for a light sake if you’re feeling festive. These sides keep the focus on the Oyakodon while rounding out a satisfying dinner.
15-Minute Oyakodon (Japanese Chicken & Egg Rice Bowl)
This quick & easy Oyakodon features tender pieces of chicken simmered in a sweet and savory broth and wrapped in a soft egg scramble to be served over a warm bed of rice. This simple & delicious donburi comes together in a single pan in just a few minutes, making it the ideal comfort meal for the weekdays.
Timing
Recipe Details
Ingredients
- 01 150 g skinless boneless chicken thighs (cut into small pieces)
- 02 1/2 medium onion (sliced)
- 03 1/2 cup chicken stock (or dashi)
- 04 1 tbsp soy sauce (or more to taste)
- 05 1 tbsp mirin
- 06 1 tsp sugar
- 07 2 large eggs
- 08 1 1/2 cup cooked rice (to serve)
- 09 green onion, sesame oil, nori and/or togarashi (optional, for garnish)
Instructions
Combine chicken, soy sauce, mirin, and sugar in a bowl and set aside for 5-10 minutes while preparing the other ingredients.
To prepare the egg mixture, crack the eggs into a bowl and gently break the yolks using a pair of chopsticks. You want to make sure the eggs are lightly beaten with the egg whites still visible.
In a small pan, bring chicken stock to a boil over medium heat. Add onion and cook until aromatic, about 1 minute. Add the chicken mixture and cook for about 1-2 minutes on each side.
When the chicken is almost cooked through, pour the egg mixture evenly into the pan and cook for a few seconds until the edges are nearly set.
Lightly scramble the eggs and cook for a few seconds more until the eggs are still a bit runny - the residual heat will continue to cook the eggs. Serve over a bowl of rice, garnish and enjoy!
FILED UNDER:
NUTRITION FACTS (PER SERVING)
Nutrition information is calculated using an ingredient database and should be considered an estimate. In cases where multiple ingredient alternatives are given, the first listed is calculated for nutrition. Garnishes and optional ingredients are not included.
Frequently Asked Questions About Oyakodon
Can I make Oyakodon ahead of time?
You can prep the ingredients and broth a few hours in advance, but cook the eggs right before serving to keep them soft and fresh. Assembling the full dish ahead might make the texture a bit off, so it’s best enjoyed fresh. If needed, reheat gently as mentioned in storage tips.
How long does Oyakodon last in the fridge?
Oyakodon keeps well in the fridge for up to two days in an airtight container. Beyond that, the eggs may not hold up as nicely. Always reheat thoroughly to ensure safety.
What is the origin of Oyakodon?
Oyakodon hails from Japan, specifically popularized in the early 20th century as an affordable, hearty donburi dish. It’s a beloved comfort food in homes and izakayas alike. The name playfully refers to the chicken and egg pairing.
Is Oyakodon gluten-free?
Traditional Oyakodon uses soy sauce, which contains gluten, but you can easily swap it for tamari to make the whole dish gluten-free. This keeps all the flavors intact in your Oyakodon. Double-check labels on mirin too, as some varieties might have additives.
Can I use chicken breast instead of thighs for Oyakodon?
Yes, chicken breast works, but it can dry out faster, so slice thinly and don’t overcook. Thighs are preferred for juiciness in this Oyakodon, but breast is a fine leaner option. Adjust cooking time slightly if needed.
How spicy is Oyakodon?
Oyakodon is not spicy at all in its classic form—it’s savory and sweet with mild flavors. For heat, add chili oil or togarashi to your Oyakodon when serving. This customization lets you control the kick.
What’s the best rice for Oyakodon?
Japanese short-grain rice is ideal as it holds up well under the toppings and absorbs the broth beautifully. Jasmine rice is a good substitute if that’s what you have. Cook it slightly firm for the best texture with your Oyakodon.
Can kids eat Oyakodon?
Absolutely, Oyakodon is mild and comforting, making it kid-friendly. You might reduce soy sauce for less saltiness if desired. For more family meal ideas, see this quick General Tso’s chicken recipe.
Final Thoughts
From the first simmer of the broth to that last satisfying bite, this Oyakodon recipe has everything you need for a cozy, flavorful meal that brings a taste of Japan right to your table. I’ve shared it with friends and family, and it always gets rave reviews—it’s that good. So, what are you waiting for? Whip up this easy Oyakodon tonight and let me know how it turns out; I can’t wait for you to love it as much as I do. If you’re craving more chicken dishes, try this air fryer chicken skewers next.